Table of Contents

    Antimalware Service Executable – What Is It And How To Disable It?

    Antimalware Service

    Microsoft’s embedded antivirus software, known as Windows Defender, ensures that measures are in place to safeguard systems at all times. Even if you haven’t installed an antivirus solution on a Windows operating system or have out-of-date software running, your system will automatically install Windows Defender. One crucial functionality that accompanies this system is the Antimalware Service Executable.

    Windows Defender's background service, an executable service file, runs in the background and continuously checks the system for malware, typically when each file is accessed. The executable will perform background scans to detect malicious content and update antivirus definitions as they’re released.

    As useful as this feature is, it may hog memory and disk space. Therefore, you might want to disable it. Here’s how you can disable this to save your device’s resources.

    Antimalware Service Executable In Detail 

    If you have Windows Defender, you’ll find it among the background processes, within the Antimalware Service Executable, in the executable file msmpeng.exe. This executable allows the Windows Defender application to monitor your system continuously for potential threats. It aids in providing all-time, well-rounded protection against malware and other forms of cyberattacks. 

    In general, the process keeps running in the background and detects anything potentially harmful. Additionally, it keeps continuously scanning the device for worms and viruses. Thus, causing high CPU usage that’s very disproportionate. Since the executable relies on the CPU mostly for its functioning, it might lead to delays, lags, and other miscellaneous disruptions while running. As much as this application might provide real-time protection, it takes a toll on the system’s overall performance.

    How Do I Stop Antimalware Service Executable From Using My Memory?

    It protects your system from various cyber-attacks, and in the process of providing real-time protection, it uses up a ton of memory. When the executable file is running, it triggers a detailed scan. That’s why you’ll experience issues like lagging and delay in processing. 

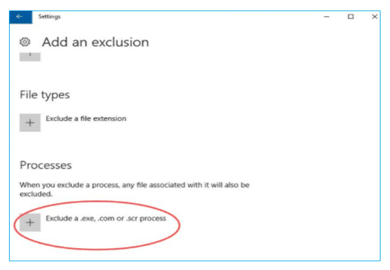
    You can try the following fixes to prevent the Antimalware Service Executable from high memory consumption of your device(s):

    FIX 1: You Can Add The Antimalware Service To The Exclusions List

    Since Windows Defender performs continuous scans, there’s increased system involvement, which often causes a system slowdown. 

    Add The Antimalware Service To The Exclusions List

    1. Open "Windows Task Manager" by using Ctrl + Shift + Esc and look for "Antimalware Service Executable" in the process list
    2. Copy the complete file path of the "Antimalware Service Executable" from the address bar
    3. Open the "Virus and Threat Protection" settings from the Windows Defender Security Center
    4. Open Exceptions and add the copied address and add it to the exceptions

    FIX 2: Disable Windows Defender

    You can opt to disable Defender entirely if you encounter persistent issues. Make sure you install an external antivirus before you disable Windows Defender completely.

    1. Press the Windows key and R, and the running dialog box opens up
    2. Type "Regedit" in the dialog box
    3. Type "HKEY_LOCAL_MACHINE\SOFTWARE\Policies\Microsoft\Windows Defender
    4. Set the data value of "DisableAntiSpyware" to 1
    5. If "DisableAntiSpyware" isn’t found, right-click on Windows Defender: Click New> DWORD (32 bit) value
    6. Rename this entry as "DisableAntiSpyware"
    7. Set the data value of "DisableAntiSpyware" to 1

    Antimalware Service Executable High CPU Usage And How To Fix It 

    If the Antimalware Service Executable process shows a high CPU usage on your Windows 10, don't worry. We have easy solutions for you to deal with that. Try these easy methods to fix the problem:

    FIX 1: Windows Defender's Scheduling Options

    You can change the Windows Defender’s scheduling options to effectively resolve the high CPU usage issue caused by the protection feature.

    Windows Defender's Scheduling Options

    1. Press the Windows key and R:  the running dialog box will open up
    2. Type in “taskschd.msc” and run it.
    3. Click on the Task Scheduler: Library > Microsoft and select "Windows"
    4. Expand to "Windows Defender,” then double-click on "Windows Defender Scheduled Scan"
    5. Open the property window and uncheck the box that says "Run with highest privileges"
    6. Make sure to uncheck the items that are listed in the "Conditions" section
    7. These steps will help you fix the issue of high CPU usage

    FIX 2: Try Adding Antimalware Service Executable to the Exclusion List of Windows Defender

    Adding Antimalware Service Executable to the Exclusion List of Windows Defender

    1. Press the Windows logo key and select the “Settings” icon
    2. The Settings window will open up
    3. Select "Updates
    4. Choose "Windows Defender" and choose "Add an exclusion" 
    5. Click "Exclude a .exe, .com” 
    6. You can optionally select "Exclude .scr process"
    7. Type in “Msmpeng.exe”

    FIX 3: Fully Disable Windows Defender

    You can opt to disable Windows Defender completely if the unfolding performance problems are simply unmanageable. Make sure you install an external protector against viruses before you disable Windows Defender completely.

    Fully Disable Windows Defender

    1. Press the Windows key and R, so the Run dialog box will open up
    2. Type "Regedit" in the dialog box
    3. Type "HKEY_LOCAL_MACHINE\SOFTWARE\Policies\Microsoft\Windows Defender
    4. Set the data value of "DisableAntiSpyware" to 1
    5. If "DisableAntiSpyware" isn’t found, right-click on Windows Defender. Click New> DWORD (32 bit) value
    6. Rename this entry as "DisableAntiSpyware"
    7. Set the data value of "DisableAntiSpyware" to 1

    Antimalware Service Executable High Disk Usage and How to Fix It

    The above fixes must help you with memory and CPU usage. In case your issues still aren’t resolved, you can implement one of the following strategies to manage high disk usage.

    Fix 1: Update The Drivers Manually

    1. Go to the manufacturer's website
    2. Search for the latest update for the driver for the device that you are using
    3. Make sure that you select the compatible drivers for your device and the operating system that’s used

    Fix 2: Update The Drivers Automatically

    If you feel like manually updating drivers is too time-consuming and inefficient, you can automatically choose to do the process. 

    Update The Drivers Automatically

    1. Download and install any automatic updater, such as "Driver Easy”
    2. You can run this software in your system and select the “Scan Now” button
    3. You can choose the “update all” button to update all the outdated drivers present in your system
    4. The Pro version of the software allows you to automate the process completely

    Antimalware Service Executable High Memory Usage And How To Fix It 

    It’s normal for the said executable file to use up disk resources and memory slots. You can try the following fixes to prevent the "Antimalware Service Executable" from using up a lot of memory:

    FIX 1: Disable Windows Defender 

    You can choose to disable Windows Defender, but make sure you install an external antivirus before eliminating Windows Defender.

    1. Press the Windows key and R, and the running dialog box opens up
    2. Type "Regedit" in the dialog box
    3. Type "HKEY_LOCAL_MACHINE\SOFTWARE\Policies\Microsoft\Windows Defender
    4. Set the data value of "DisableAntiSpyware" to 1
    5. If "DisableAntiSpyware" isn’t found, right-click on Windows Defender. Click New> DWORD (32 bit) value
    6. Rename this entry as "DisableAntiSpyware"
    7. Set the data value of "DisableAntiSpyware" to 1

    FIX 2: You Can Add The Antimalware Service To The Exclusions List

    Since Windows Defender performs continuous scans, there’s increased system involvement, which in turn will cause a system slowdown.

    1. Open the "Windows Task Manager" by using Ctrl + Shift + Esc and look for "Antimalware Service Executable" in the process list
    2. Copy the complete file path of the "Antimalware Service Executable" from the address bar
    3. Open the "Virus and Threat Protection" settings from the Windows Defender Security Center
    4. Open Exceptions and add the copied address and add it to the exceptions

    In addition to the fixes described above, you can choose to change the scheduling of Windows Defender to optimize the process. For instance, try changing the trigger time to the desired weekly or monthly option. In the privileges settings, it’s possible to disable the option to run it with the “highest privileges.”

    Should I Keep Using Antimalware Service Executable Or Stop It Completely? 

    Even though the Antimalware Service Executable causes high memory usage, CPU usage, and other issues, it has its pros as well. Normal levels of disruption in performance are tolerable while running a real-time protection system, such as the Antimalware Service Executable. However, if you record an abnormal variation in performance, it can be due to some other infection, for example, malware that’s causing malevolent performance. 

    Despite all disruptions, Windows Defender has proven to be more than useful. The best option is to disable the Antimalware Service Executable. However, tweaking the settings can help you cancel out the issue. You can tweak the “periodic scanning” settings to reduce the impact on your system.

    If you feel like you don't need real-time protection, it’s always better to have another antivirus software that can be manually triggered.

    Yet, it isn’t advisable to disable Antimalware Service Executable without having an alternative to Windows Defender.

    Bottom Line

    Windows Defender has proven to be a great tool in safeguarding the system and preventing it from making imminent threats. The Antimalware Service Executable on Windows 10 helps provide real-time protection but uses up a lot of CPU space and memory. 

    Implementing the fixes mentioned above can help you realize all the benefits of the Windows Defender without compromising your system’s efficiency and performance.